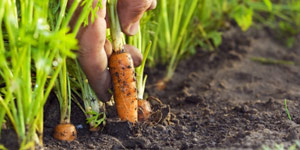
Vegetable Garden
 The modern-day vegetable garden has its roots in the potager garden of the French Renaissance, in which vegetables were selected for their aesthetic as much as their culinary values, although the practice of growing vegetables is itself ancient.
Today’s vegetable gardeners, planting in backyards or community plots, have adopted the use of small, intensively planted spaces. The rewards of such gardens are as much the enjoyment of maintaining the garden itself as they are the harvest.
A properly managed small vegetable garden (5’x5′) can yield as much as 200 pounds of food.
This guide is designed for the gardener who is operating on a small scale and short on time.
With the proper planning and preparation, small plots can be established to produce a healthy yield at a minimal cost to the gardener.
After the initial work of establishing and planting the garden, the techniques discussed here will not require a great deal of work on the gardener’s part to do so.
I’ll begin this guide about building a vegetable garden with an explanation on selecting the site and planning the garden, and explore different techniques for laying it out.
I’ll then give you some vegetable gardening tips such as examining soil requirements for a healthy vegetable garden, and discussing techniques to improve the soil such as double-digging beds and adding compost and manure.
I advocate planting vegetable gardens in deeply dug, raised vegetable beds, and will discuss reasons for this method.
A discussion on watering techniques follows that will help determine which technique is best for your garden, and I will also talk about garden maintenance, with an eye towards weed and pest management that doesn’t require chemical herbicides or insecticides.
I’ll round out this guide with a brief presentation of container gardening, which will be covered more extensively in another guide. I’ll finish with suggestions for preserving your harvest, extending the garden’s productivity into the fall with cold frames and root vegetables, and finally I’ll discuss planning for the following year by saving seeds and putting the garden to bed for the winter.
I hope you will be pleasantly surprised by what you can produce in your own garden by following the techniques discussed in this guide. The accomplishment of growing your own vegetables from seed to plate is intensely rewarding and can become a lifelong passion.
If you would like to develop your vegetable garden by following organic gardening principles, I invite you to check my other guide completely dedicated to organic gardening.
Welcome to your vegetable garden.
1. Planning a Practical Vegetable Garden
 The key to a successful vegetable garden is thorough planning and preparation. If this is done properly, a relatively small site can yield many times more vegetables than it otherwise would. The first step in this process is selecting the site, deciding what to grow, and planning the layout of your garden.
1a. Selecting The Site
The vegetable garden does not have to be composed of one large plot: it can be broken up into several smaller ones that are scattered throughout the yard or even the neighborhood. Each one can be planted as a mix of vegetables, or they can be specialized, with one dedicated to salad greens, one for heirloom varieties, and so forth.
Given a choice, you should locate your garden where it will not be shaded by buildings or trees. Fruiting vegetables, such as tomatoes, peppers, and squash need at least eight hours of full sun a day to thrive. Cool-season and root vegetables will tolerate shade. Tree roots will compete for nutrients in a wide area, and plants within this area can do poorly. Avoid low, wet, and sloped areas: these areas prove difficult to maintain a controlled environment in. Sloped areas may be terraced, although this is hard work. If possible, locate the garden close to a water supply.
1b. Deciding What To Grow
You should consider a number of factors when determining the list of vegetables to grow. The space available to you is a major determinant in what can be grown. Descriptions in seed catalogues will say how large plants are expected to get. At full maturity, the foliage of each plant should be barely brushing its neighbors’. Be aware that certain plants, like zucchini, will grow massive bushes that crowd out neighbors, and that others, like acorn squash, grow along wandering vines that snake through the garden. Certain heirloom varietals have been bred to grow small; be on the lookout for these. Select a mix of vegetables that efficiently utilizes your garden size.
Look up which hardiness zone you are in when deciding what to plant, and compare this to each vegetable’s number of days to maturity. If you are in an area with a short growing season, plan accordingly. In warmer climates, the growing season can be extended to nearly year-round; I will discuss methods of doing this later. In colder climates, several vegetables can be started from seed indoors about 4 – 12 weeks before the last frost. As with size, seed packets will instruct you on which seeds to start indoors, and when to do so. Seeds started indoors do best if kept warm and moist, and will thrive under a grow lamp. It’s best to start seeds in individual containers so as to minimize transplant stress. Be sure to label the containers to avoid confusion later.
1c. Planning Your Vegetable Garden On Paper
Once the site(s) and the vegetables are selected, it’s time to begin planning your vegetable garden layout. Always begin by planning the garden on paper. It’s useful to draw this plan to scale, as this allows for accurate space allocation, but experienced gardeners may simply sketch a rough plan. Consider the relative heights of what is being planted, and make sure plants aren’t shading one another out: the tops of plants should gently slope upwards from the front to the back of the garden.
1d. Intercropping and Succession Planting
It’s effective to use a system of dynamic grouping or companion planting when laying out the garden. Dynamic groupings consist of a dominant central plant surrounded by secondary and tertiary plants: this could be tomatoes, surrounded by plantings of cabbage and peppers, and then a tertiary semicircle of lettuce and radishes. Companion planting is the pairing of plants that have a synergistic relationship and avoiding pairs that have negative relationships. Companion planting can repel pests and attract beneficial insects, balance soil pH and nutrients, and improve yield and flavor. Breaking up the pattern the garden’s uniformity will also make it harder for pests or diseases specific to one type of plant to spread through the garden, as buffers are created between identical plants.
Intercropping is a kind of companion planting that focuses on intensifying efficiency in terms of yield per unit area and economizing water use. It can be accomplished in various ways, but the central goal is to plant vegetables that do not compete directly with one another in a limited space. For example, a tall crop may be planted along with a shorter, shade tolerant plant.
Succession planting is a practice that is designed to prolong the life of the garden based on length of time to maturity. In this system, a few different plants are planned to occupy the same location, one immediately after the other. For example, plant cool-season vegetables such as lettuce and spinach just after the last frost, followed by tomatoes or peppers during the summer, and finally root vegetables in the fall. Long-term succession planting is intended to maintain the health of the soil by planting vegetables that replace nutrients after ones that remove it. The simplest formula for this is Greens, Beans, Roots, Fruits. Rotating vegetables around the garden will keep the soil rich without requiring chemical fertilizers.
1e. The Shape of the Garden
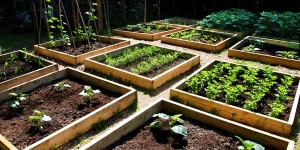
If given a choice, consider the shape of your garden when planning. It can be any shape, and uniform or free-flowing, but attention should be paid to how accessible the center of the planting area is from the outside. Gardens can be circular, with individual plots arranged like pie slices, and paths along the cross. These necessitate careful planning regarding shading, but can create aesthetically pleasing arrangements. Rectangular plots more than three feet (1m) wide are difficult to reach from the outside. Having to step on the soil to reach the center of the garden causes the soil to become compacted, and if the garden is intensively planted, the foliage will prevent reaching the inner plants. An ideal vegetable garden is a group of plots about three by six feet (1m x 2m), with a total planting area of at least 30 square feet (2.8m2). Smaller gardens can grow a few different vegetables, or else consider mixing vegetables into a flower bed.
Once you’ve determined what you will grow and how you will lay it out, and you’ve started vegetables indoors, the next step is to prepare the soil and dig the beds.
2. Preparing the Soil and Planting
 When first starting a vegetable garden, it is likely that the soil in your plot is not quite ideal. It may be too rocky, too sandy, or have too much clay. If you are establishing a raised bed vegetable garden, something I strongly recommend, you will need to create a soil mix with which to fill them. To begin, let’s explore what soil is.
2a. What Soil Is Best For A Vegetable Garden?
Soil has three main components: minerals, organic matter, and water. Typically, soil is about fifty percent minerals, five percent organic matter, and the rest water and air. Mineral particles in soil are classified according to their size. Clay particles are too small to be visible to the naked eye, and clay absorbs water slowly but holds onto it very tightly. Dry clay is extremely difficult to break up without soaking it first. Silt particles are the next largest, about as fine as baking flour, and are powdery when dry, and greasy when wet. Sand particles are the largest, and have plenty of space between one another, which makes it easy for roots to penetrate sand, but also means sand won’t hold moisture well.
Most soil found in backyard gardens is some combination of these three types of particles. Evaluate the soil structure to determine whether your soil is more clay or sand. This can be done by simply picking up a ball of moist soil and rubbing it against your hand. Too much clay and the soil will be shiny when it is compacted. Sandy soil feels gritty. Silt will make the soil feel greasy, but will not be as shiny as clay.
The ideal mixture will be loam, which is about ten to thirty percent clay, thirty to fifty percent silt, and twenty to forty percent sand, plus a good deal of humus, or decomposed organic matter. Loam retains enough moisture to promote plant growth, but also drains well, and has enough room for air to circulate and roots to grow. If the soil holds its shape, and crumbles when given a slight poke, it’s loam.
2b. Soil Testing
If you are planting your garden in an urban environment, such as a backyard that abuts an alley, or a reclaimed vacant lot that’s been turned into a community garden, it is important to test the soil quality. Soil tests determine the pH and nutrient quality of the soil, and can also determine important factors such as lead content of the soil. pH and nutrient quality will be important to the success of your garden, and lead content is important for your own health, as you will be consuming what you grow in this garden.
Home and garden centers provide home pH tests. Most plants grow best in soil with a pH of six or seven. If your soil pH is too acidic (too low), it can be adjusted by adding lime. Add about six ounces of lime per square foot (or 1.8 kg per m2), mixing it evenly into the top eight inches (20 cm) of soil, and sprinkle on the top of the soil as well.
Soil samples can also be sent to laboratories for more comprehensive testing. These laboratories provide a full listing of soil nutrient quality as well as recommendations for improvement. The labs can be found online, and most offer soil tests for less than ten dollars.
2c. Double-digging, Tilling, Compost, and Manure
Soil quality can be improved dramatically by adding organic matter, preferably in the form of compost. Compost is a mixture of decomposed organic material. Every good vegetable garden should have its own compost bin. Community gardens often have a compost bin and are generally happy to share with anyone who asks.
When starting a vegetable garden, begin your own compost pile immediately. Compost is a mixture of decayed kitchen scraps, grass clippings, leaves, and other organic materials. Kitchen scraps can be any organic materials other than meats or fats. A good kitchen compost mix includes eggshells, coffee grounds, and fruit and vegetable matter. If you mow a lawn, you can use grass clippings in your compost. Add leaves in the fall.
A successful compost is dependent on particle size, the amount of available nitrogen, moisture levels in the pile, and how often the pile is turned. The smaller the particle size, the faster decomposer microorganisms can break down the organic matter. Shredding materials before adding them to the compost will cause them to break down faster and be ready sooner.
The bacteria in the compost need nitrogen to work best. Nitrogen can be added in the form of chicken manure, grass clippings, and coffee grounds. The compost needs a good balance of brown matter to green matter. Simply put, brown matter is high in carbon and green matter is high in nitrogen. The ideal ratio is about 25 parts carbon to 1 part nitrogen. This is achieved by a 2-to-1 ratio of green matter to brown matter.
The pile should be kept slightly moist, but not too wet; add water if it has dried out. If the compost is working properly, it will be hot as well. A good “quick-cooking” compost pile will be between 140 and 160° F (60 and 70° C).
The compost should be turned every two to three days to keep the bacterial breakdown working. A compost pile can be turned using a gardening fork. Uncomposted material at the top and sides should be mixed into the center, where most of the action is happening. Alternately, plastic compost bins can be purchased that sit on a base with rollers and are designed to be easily turned, but these are not necessary. An orderly compost bin can be built by nailing chicken wire to wooden posts. This allows for aeration, and is not terribly difficult to turn.
If you are just starting out and do not have compost readily available, you can easily substitute a number of other amendments to enrich your soil. Leaf mold is made of finely decomposed leaves, and when tilled into the upper six inches (15 cm) of soil, it will dramatically increase its productivity. You can buy leaf mold, or shred leaves with a lawnmower or leaf shredder.
Peat moss is the decomposed remains of prehistoric plants that have been compacted for millennia beneath swamps and bogs. It has good aeration and the best water retention of all soil conditioners. Peat moss should be tilled into the very top of the soil, and watered well.
Animal manures are vital to any successful vegetable garden because they build soil structure and add nutrients, particularly nitrogen, to the soil. There are two types of manure, “hot” manure, from horses, chickens, sheep, and rabbits, which has high nitrogen content; and “cold” manure, from cows and pigs, which has lower nitrogen content. Generally speaking, hot manure is better for new gardens.
2d. Raised Beds
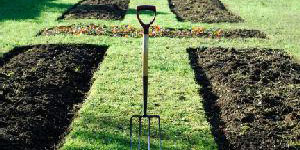
Once you’ve assembled you soil ingredients, it’s time to double-dig and construct your raised beds. If you are building a raised bed in a constructed planter, and filling it from the ground up, double digging is not required. However if you are planting your raised bed on topsoil, especially if it is in a plot you have not previously grown vegetables in, double digging is highly recommended.
First, using a spade, dig a trench about a foot (30 cm) deep, as wide again, and as long as the garden. Then, using a gardening fork, break up the bottom of the trench, also about a foot (30 cm) deep. While you are doing this, add organic matter such as manure or compost to this layer. Then dig a second trench parallel to the first, using the soil removed from the second trench to fill in the first. Repeat as necessary until the entire garden has been double dug, using the soil left over from the first trench to fill in the last one. Take care not to walk on the bed, as this will compact the soil again.
Another way to aerate and break up the soil is by tilling it. Portable rotary tillers can be purchased at hardware stores, and will make soil preparation a much easier task. If your garden is particularly large, or if you share a plot in a community garden where several gardeners can benefit from a rotary tiller, it can be a huge labor and time saver. Portable diesel or electric rotary tillers generally cost a few hundred dollars. Tilling does not substitute for double digging the bed, however.
Raised beds can be constructed two ways. The easiest method is to simply add five or six inches (10 to 15 cm) of topsoil to the bed after double digging it. This seemingly minor addition will provide substantially more root space for your vegetables. The more involved way is to build planters. A planter is essentially a large box, and can be easily constructed from a number of materials. Concrete blocks, bricks, or stones can be stacked to form four walls, or the planter can be built from wooden boards screwed together at the corners. Reinforce the corners with posts sunk 12 inches (30 cm) into the ground.
2e. Planting Your Vegetables
There are two ways to begin planting the garden: by purchasing seedlings from a catalogue or nursery, of by purchasing seeds. Seeds are then either started indoors before the last frost and transplanted, or sown directly into the soil.
If you purchase seeds, it is recommended that you start them indoors six to eight weeks before it’s time to plant them outdoors. This has the advantage of ensuring that you’re planting viable seeds in your garden, and also extends your growing season, permitting an earlier harvest than would otherwise be available. Seed packets will have instructions on how to start them indoors. While you can start seeds in a flat and then move them to pots, it’s recommended to start them in individual pots, in order to minimize transplant stress. Grow lights, while not necessary, are highly recommended. A full-spectrum grow light can be inexpensively purchased at garden centers or online. Ideally, the light should be kept close to the plants and raised as they grow; this will prevent seedlings from becoming leggy. This can be done by hanging fixtures on adjustable cables or chains.
Buying seedlings is much more expensive than buying seeds, and usually limits the available variety, but it allows you to start later in the season. Be sure to select healthy-looking, compact, green leafy transplants. Avoid tall, spindly plants, wilted plants, and yellow or pale plants. Check under the leaves for insect infestations.
Whether you purchase seedlings or start your own, they must be hardened off before transplanted. This means acclimating them to outdoor conditions. When they are ready to be transplanted, slow their growth by cutting back their water supply. For about a week before planting, leave them outside during the daytime and bring them in at night. They can be left outside if placed under a cold frame; I’ll discuss how to construct these later.
When transplanting a seedling, dig a hole that is slightly larger than the plant’s root ball. Fill the hole with water and allow it to soak in. Water the seedling thoroughly before removing it from its pot. Trim off about a third of the leaves of large transplants. Be careful not to plant seedlings too deeply; this will slow or stop growth altogether.
2f. Vegetable Spacing and Companion Planting
Presumably you already planned out the garden on paper, taking into consideration spacing and companion planting. It’s important to stick to this. When transplants are first being planted, it will seem as though they have all the room in the world, but remember – the vegetables will get big!
If you do decide to plant seeds directly into the soil, follow the instructions on the seed packet. Soak the seeds overnight before planting. Thoroughly water the soil before planting seeds, and expect that not all of them will sprout. Take note of the recommended spacing, so you don’t have to do as much thinning later. Be sure to put a small stake in the ground where you plant seeds that says what is planted there.
3. Vertical Gardening and Other Projects
 In addition to building compost bins or planters for raised beds, there are a few other structures that the industrious gardener will find relatively simple to construct and invaluable to the success of the garden. These include vertical structures for growing beans and other climbers, cold frames and other protective devices for extending the life of the garden, and containers for gardening where space is limited. You can read more about this in my container gardening guide.
3a. Vertical Gardening
When allowed to wander through the garden at the surface, squash and cucumbers will take up far more space than they require. When they are trained to climb a fence or a trellis, they will thrive while freeing up garden space. There are several vertical structures that can be built for climbing vegetables. The simplest to construct is a teepee frame, which is excellent for growing beans. A teepee frame is simply several poles tied together near the top, and spread out in a circle at the base, with the poles pushed a few inches (5-10 cm) into the ground.
A post trellis is a three-sided rectangular frame fitted with twine or netting. The typical post trellis will have support posts about six feet (1.75 m) tall, sunk about one foot (30 cm) into the ground, and a six foot (1.75 m) crosspiece nailed to the tops of the support posts. Netting is simply a grid of twine nailed into the three sides and interwoven at twelve-inch (30 cm) intervals. The base of the netting is affixed to stakes which are pushed into the ground. Netting is ideal for peas, cucumbers, or melons. A twine trellis, in which lines run from the crosspiece to stakes in the ground, is useful for training beans and tomato plants.
Even large, heavy vegetables, such as summer squash or pumpkins, can be grown vertically. The trellis for these vegetables must be constructed from heavy duty wood that will support the weight. As the plant produces fruit, cloth hammocks are hung from the trellis to support them. The sight of squash nestled comfortably in miniature hammocks creates a whimsical visual effect, while saving vast amounts of space.
Additionally use established structures to train vegetables. Beans can be trained along fences, and twine netting can be secured to the sides of buildings.
3b. Cold Frames
Cold frames are essential for extending the growing season in spring and autumn, and are an invaluable tool for hardening off seedlings. They can be constructed a number of ways. If you have constructed a raised planter, a cold frame can be built from two by fours (9 cm x 4.5 cm) and clear plastic tarp. Screw the four sides together to form a frame that is the same size as the raised bed, with a support beam across the middle. Using a staple gun or small nails, attach the plastic tarp, stretched tight, to the top of the frame. Now you have a fitted “lid” for the raised bed that will let sunlight in and retain warmth.
Cold frames can be constructed from wider pieces of wood and plastic tarp to set atop beds that aren’t in planters. Lightweight cold frames can be constructed with PVC pipe and plastic tarp. Alternately they can be fashioned from found materials: Old storm windows can be placed over beds by resting them on bales of hay, which themselves will help retain warmth. Simple “hot caps” for individual seedlings can be made by cutting the bottoms off of clear plastic milk jugs or soda pop bottles.
3c. Container Gardening
Many vegetables are just as at home in a two-foot (30 cm) container on an apartment fire escape as they are on a country farm. Certain varietals, such as Patio or Pixie Tomatoes, are even bred specifically to be grown in containers. Containers can be used by the gardener who does not have a plot available to them, or they can be an attractive addition to the backyard garden. It’s useful to plant herbs such as basil or rosemary in pots so that they may be brought indoors over the winter and kept under a grow lamp for herbs year round.
Vegetables can be grown in practically any kind of container. Window boxes are easily built from wooden boards and can be used for an herb garden on the kitchen windowsill. Concrete blocks can be stacked sideways and planted to form a beautiful living wall. Terra cotta and plastic pots are available at garden centers. Pots should be selected that hold a minimum of four gallons (15 Liters) of soil. Wooden containers, either boxes or barrels, can have a trellis nailed to them to create a vertical container garden.
Hanging baskets make excellent containers for lettuce, radishes, bush cucumbers and small tomatoes. Round baskets can be hung outdoors or indoors. Half-round baskets can be attached to walls or fences.
As with gardening in raised beds or planters, soil preparation is the most important step to ensure vegetables grown in containers will thrive. A mix of 2 parts garden soil, 2 parts compost, 2 parts vermiculite and a sprinkling of lime is ideal for container gardens. It can useful to sterilize the soil by spreading it in a shallow pan and baking it at 300°F (150°C) for one hour, but this is by no means required.
Container vegetables will dry out faster than a garden and should be watered daily. If the soil is allowed to dry out completely, it will be very difficult for the plants to recover. Water container vegetables until the soil is completely saturated. It’s important not to over-water, either, or you risk root rot; do not water unless the soil is dry or slightly damp to the touch.
The key to successful garden structures is to keep them simple and be creative. Think about the goal of the structure you’re building, and then try to determine the simplest, most affordable means of making it.
4. Watering, Weeding and Maintenance
 Vegetables need to be watered carefully to ensure they mature rapidly. Not enough water and they will be stressed beyond recovery. Too much water, on the other hand, will produce plants that are weak and spindly, or bear fruit that cracks and bursts from too much water, as with tomatoes. The soil in your beds will be an even mix of loam and air, and continuously soaking the soil will prevent exchange of water and carbon dioxide at the roots, literally drowning the plants.
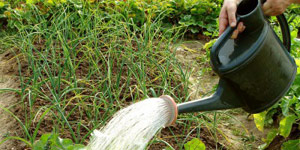
4a. Watering Methods
Another important consideration is how deep to water. Each vegetable’s roots have a maximum depth to which they will grow. In order to encourage the roots to reach their full potential, the soil should be watered down to this level. There are a number of ways this can be accomplished. Which one you choose depends on the water source available to you, the amount of time you can spend watering, and how much infrastructure you’re willing to build into an irrigation system.
Hand-watering is less efficient and more time consuming than drip-watering with an irrigation system, but it uses less water than overhead watering with a sprinkler. Depending on your water source, you may be using a hose to hand water or carrying watering cans from a rain barrel or cistern. If using a hose, it’s useful to acquire a nozzle designed for this purpose. Hand-held wands are excellent tools for watering beneath the leaves. Other nozzles can produce a fine mist that is ideal for watering newly planted beds.
Sprinklers tend to waste water, but they are a simple means of watering for the busy gardener. If using a sprinkler, it’s important to water in the evening or very early in the morning. If you water the garden during the day, droplets of water on the plants’ foliage can magnify sunlight and burn the leaves.
There are a number of irrigation systems that can be constructed at varying levels of cost and complexity. The simplest methods involve sinking eighteen inch (45 cm) metal or plastic pipes into the ground next to one or more plants, and filling them whenever you water the garden. This will encourage vigorous growth at the roots while using less water. A more complex piping system may also be constructed, with one master pipe running the length of the garden, and jointed at intervals to allow water to seep into the soil. Alternately you can sink perforated milk jugs into the ground, and keep them filled. The water will seep into the ground and keep moisture relatively constant.
Irrigation systems that drip or seep water into the soil are available at home and garden centers. These are perforated tubes or hoses that allow water to escape along the length of the hose at varying rates. They are another useful method for the gardener who doesn’t have time to hand water. Explore various systems to see what is right for your garden. Test their efficiency by probing the soil: push an eighteen-inch (45 cm) stake or metal rod into the soil. Dry soil will be more resistant than wet soil; this is a simple way to assess how deep your watering system is working.
Certain municipalities allow and even encourage saving rain runoff by offering vouchers for rain barrels. A rain barrel attaches to the downspout of a roof’s gutter system, collecting runoff. Other municipalities expressly prohibit rain collection in non-permeable structures, but allow it in casements. Look into your area’s laws before deciding to collect water.
4b. Weeds: Prevention and Mulching
Weeds are a constant bane of any gardener, but with the right preparation their proliferation in your garden can be minimized. Starting seedlings in your garden gives them a head start over weeds and allows them to compete. You can mulch with organic or inorganic material. If using organic material, the goal is to create a thick enough layer to block light from reaching weeds. Inorganic materials such as black plastic sheeting or landscaping fabric are nearly foolproof methods of blocking weeds, although they can prove costly. If you have planted your garden intensively, as I recommend, the vegetables will eventually be large enough to create a kind of shady mulch on their own. Finally, weed aggressively. Pull any weeds you see, as soon as you see them, and be sure to pull out the entire root, as many weeds can grow back from below-ground structures.
4c. Vegetable Garden Pests
Pests, whether in the form of insects, birds, or mammals, are another major problem faced by vegetable gardeners. While some loss to pests is inevitable in any garden, it can be minimized. There are a number of passive solutions to these invaders. First and foremost, keep the garden clean of weeds, trash, and detritus. This debris provides a refuge for diseases and insects to multiply and survive the winter. Diseased plants and fruit should likewise be kept out of the compost pile. Don’t buy or plant diseased plants, and if necessary, cull individuals that develop disease to keep it from spreading. As mentioned earlier, breaking up the garden’s uniformity and rotating crops will slow the spread of disease in the garden.
Birds can be dissuaded somewhat by attaching shiny silver ribbons to stakes and planting them throughout the garden. Hot caps made from milk jugs double as barriers to birds when seedlings are most vulnerable, as do cold frames. Commercial netting can be purchased to place over the garden in order to dissuade birds.
Fencing will help keep certain animals, such as rabbits and deer, out of the vegetable garden. Chicken wire is one of the simplest means of fencing in the garden. Unfortunately fencing will not dissuade squirrels, cats, or raccoons: to some degree, pungent materials such as moth balls, chili powder, and stale cigars will repel them.
Insects are far and away the most insidious pests that can find their way into your garden. There is a wide variety of insects and nearly as many home remedies for them. There are too many to list here, but they are described on internet gardening sites. Simple methods such as washing aphids off with soap and water are effective and inexpensive. I strongly advise against chemical pesticides. Chemical pesticides can be absorbed by many vegetables and wind up being consumed by anyone who eats them. Their overuse also promotes development of resistance in some pests.
Better still are insects that will work on your behalf: top predators such as ladybugs, lacewings, and praying mantises, and parasites such as braconid wasps. These can be purchased by mail from breeders. Ladybugs are some of the most voracious predators, but will tend to abscond from the garden if conditions aren’t just right. Praying mantises are excellent omnivores, consuming beetles, caterpillars, and flies alike, but need a good deal of space. Be sure to familiarize yourself with the instructions that come with these excellent allies to ensure they stay in your garden.
5. Harvest!
 Congratulations. A season of hard work has paid off, and your garden has happily produced more vegetables than you expected. Hopefully you have plenty of recipes to use them in and friends and family to share them with, but if you find you’re still left over with more vegetables than you know what to do with, perhaps it’s time to consider learning how to can and preserve vegetables. There are a number of excellent books and online guides on the subject, and getting started is relatively easy and affordable. Canning, pickling, and preserving your own vegetables will allow you to enjoy the vegetable garden’s bounty in the deep, dark months of winter, and will help you look forward to the spring!
If there were varietals that you found particularly successful, consider taking part in the age-old tradition of seed saving. Remove the seeds from these plants, dry them, and store them in labeled envelopes for next year – or share them with friends and family.
As autumn shortens the days, hopefully you have extended your vegetable garden’s life by planting a crop of cold season vegetables and covering them with your cold frames. But eventually the frost is going to come, and before it does, you’ll want to put your garden to bed. There are various ways to do this. As plants begin to die, they should be taken down and composted. The garden bed should be gently forked to aerate it. Then it can either be heavily mulched with leaves and other detritus, followed by a layer of straw. This will keep the bed somewhat warmer than ambient temperatures, allowing bacteria and worms to continue to compost it longer than they otherwise could, yielding a healthy loam the following spring.
Alternately, you can sow a cover crop of winter rye in the fall, a hardy, fast-growing crop that will quickly produce ground cover to protect your garden and retain nitrogen. The winter rye can be sown by broadcasting seeds on the garden and watering them thoroughly. It will grow to between three and four feet (1m). After it flowers, it should be mown and left on the ground, and covered with a layer of straw.
Once your vegetable garden is tucked in for the winter, and vegetables are preserved for winter pies and sauces, it’s time to start planning for next year.