How To Grow Onions
 I am very excited to share this guide about how to grow onions with you today.
Onions are one of the most versatile vegetables out there.
It is unlikely that cuisine worldwide would be anything like what it is today if onions did not exist, and it is even more unlikely that food would be nearly as delicious as it is without them.
Onions add their special flavor and pungency to everything from spaghetti sauces to salads to roast chicken and highbrow dishes like boeuf bourguignon.
In addition to their wonderful flavor, there are so many health benefits to onions that even the international World Health Organization recognizes them as a medicinal treatment and preventative defense against many chronic diseases.
People probably first learned how to grow onions in Asia, and have been growing them since before recorded history. Humans began learning how to grow onions long before many other vegetables we take for granted became common. The onion is even mentioned in the Old Testament of the Bible. There are over 300 species of onion, and some of them are native to North America. Wild onions still grow in many parts of the world today, including the Americas. Domesticated varieties were brought to the Americas by Spanish explorers.
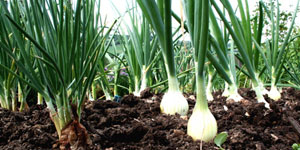
You can learn how to grow onion bulbs over a wide range of soil types and climate conditions, and onions can be grown in nearly all parts of the United States. The production of the bulb of the onion is not dependent on the size or maturity of the aboveground plant: instead it is dependent on the photoperiod, which is the amount of available sunlight during the day. Early or Southern cultivars require twelve hours of daylight to form bulbs, while Late or Northern cultivars require fifteen hours of daylight. Onion cultivars adapted to the South do not grow well and form small bulbs in the North. Some bunching cultivars, such as Evergreen, are used for green onions produced from seed. These cultivars are a different species and do not form bulbs at all. So you can see that when you are learning how to grow big onions, the amount of daylight available in your area will be an important consideration for the variety you choose.
Given the correct care and growing conditions, and using intensive spacing methods, you can learn how to grow onions in such a way that you will easily harvest up to 180 onions from a single 5 foot x 5 foot bed. The secret lies in the proper preparation, care, and conditions, as well as selecting the right variety for how to grow onions that are tailored to your intended use.
In the first section of my guide on how to grow onions, I will explain how to select the right variety of onion for you. In the second section, I will discuss starting onions. This is an important section, because onions typically require a long growing season. Third section will deal with preparing the soil and planting onions. Fourth section will discuss maintenance, weeds, diseases and pests. And fifth section will explain the ins and outs of harvesting onions.
Are you ready to get started on learning how to grow onions? Let’s go!
1. Varieties of Onions
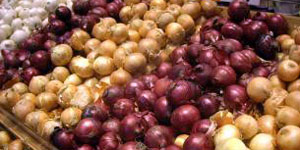
We can categorize onions a number of different ways. There are onions that form bulbs and onions that do not form bulbs; there are sweet onions and pungent onions; there are multiplier onions and seed bearing onions, and those are only a few of the categories. For the purposes of learning how to grow onions, we are going to stick with the common bulb forming and seed bearing onions that are most typically grown in home gardens and that you are probably most used to seeing in supermarkets.
These onions, which are typified by the red, white, and yellow varieties that you see in the grocery store produce department, can be divided into short day, long day, and medium day onions based upon how much sunlight they need in order to form a proper, edible bulb. Long day onions, which are the same as Northern or Late onions, require at least fifteen hours of sunlight a day. Medium day onions, which are the same as Southern or Early onions, require twelve to thirteen hours of sunlight a day. And short day onions only need about nine or ten hours of sunlight to form a bulb.
The number of hours of sunlight you receive in your backyard during the height of midsummer is primarily dependent on your latitude. During the summer, the further from the equator you are – whether North or South – the more sunlight you will see during the summer. This is why in Alaska, for example, summer days can be 24 hours long, with the sun never setting. This is also why long day onions are called Northern onions. Functionally speaking, for how to grow onions of the long day variety, you will need to be at a latitude higher than 40 degrees.
There is a fairly easy rule of thumb for determining your latitude in the United States. If you live on the East Coast, 40 degrees runs through Newark, New Jersey, and Pittsburgh, Pennsylvania. If you live in the Midwest, it runs through Columbus, Ohio, and just north of Springfield, Illinois. If you live in the Great Plains, it runs through Lincoln, Nebraska, and Denver, Colorado. If you live on the West Coast, it runs about 100 miles north of Sacramento, California.
In addition to latitude, it is important to consider how much sunlight your backyard itself gets. Perhaps you live in Chicago, which should be at an ideal latitude for how to grow onions of the long day variety, as it easily gets fifteen hours of sunlight during the height of midsummer. But you might have other buildings or a tree line that shades your onion patch for four or five hours a day. If this is the only location you have available to grow onions, you may want to consider growing a medium day variety instead.
The choice of whether to learn how to grow onions that are medium day or long day is made for you based on where you live and the amount of sunlight your backyard gets each day, but there are still some other considerations including taste and keeping qualities. Perhaps you want to learn how to grow onions that are good for storage, or perhaps you want to learn how to grow onions that are best for storing. When it comes to storage ability, as a general rule northern or long day onions have a definite advantage over short day onions. Generally speaking, the more pungent a variety is, the better it will keep, and long day onions usually (but do not always) store better than short day onions. The following list of onions is far from exhaustive – that would be nearly impossible given the hundreds of varieties out there – but it does provide some common and heirloom varieties that have been successful in many home gardens.
- Red Creole (short day, good for storage): Hard, flat bulbs with spicy red flesh. 130 days to harvest.
- Bermuda (short day, good for fresh eating): Hard, flat bulbs with satiny white flesh and sharp flavor. 95 days to harvest.
- Torpedo (short day, good for fresh eating): Torpedo shaped bulbs with deep reddish to purple flesh and mild flavor. 110 days to harvest.
- Excel (short day, good for fresh eating): Round bulbs with yellow flesh and mild flavor. 120 days to harvest.
- California Early Red (medium day, good for storage): Round, red bulbs with mild, sweet flavor. 160 days to harvest.
- Long Yellow Sweet Spanish (medium day, good for storage): Oblong, creamy yellow bulbs with brown skin and mild flavor. 120 days to harvest.
- Yellow Globe (medium day, good for fresh eating): Round, yellow bulbs with brown skin and mild, sweet flavor. 200 days to harvest.
- Candy Apple Red (medium day, good for fresh eating): Somewhat flattened globes with bright red skin and deep red flesh with mild flavor. 95 days to harvest.
- White Sweet Spanish (long day, good for storage): Round, white bulbs with mild, sweet flavor. 110 days to harvest.
- Yellow Sweet Spanish (long day, good for storage): Round, creamy yellow bulbs with brown skin and mild flavor. 115 days to harvest.
- Walla Walla (long day, good for short storage if not eaten fresh): Famous for its large size and very sweet flavor. 110 days to maturity (300 if allowed to overwinter).
- Brunswick (long day, good for storage): Flattened bulb with deep red to purple skin and mild to sweet flavor. 120 days to harvest.
- Alisa Craig (long day, good for fresh eating): Globe shaped bulb with pale yellow skin and mild flavor. This onion is known for its very large size – up to five inches if grown under proper conditions. 110 days to harvest.
2. Starting Onions
 Onions typically require a long growing season, so it is to our benefit that they are not particularly sensitive to frost damage. When you are learning how to grow onions, you can start or plant them in one of three ways: from seed, from transplants, and from bulbs.
In areas such as Southern California, Georgia, Florida, or Alabama, you can plant seeds directly in the ground in the fall and harvest them in the spring. In fact, this is precisely what growers of the widely know Vidalia onion do. The Vidalia onion is not its own unique variety, but is rather a strain of the Grano (or Granex) onion that is sweet because of the particular conditions of the soil in that region combined with being grown from seed over the winter months. So if you live in one of these warmer climates, it could be worthwhile to experiment with learning how to grow onions from seed.
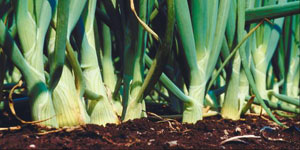
However, if you live in a cooler climate, you will find that if you plant onions from seed, even if you do so as early as possible in the spring, you will have a harvest that yields very small bulbs. However what you can do is learn how to grow onions for bunching. In that case, you plant the seeds very close together and use the sprouts – once they are about the size of a pencil – as “bunching onions” that you can add to salads and soups. These have a delightfully mild flavor and add a nice textural element to salads.
In order to grow a bulb, onions have to get a lot of energy from the sun. Outside of very warm areas, they will have to be given a head start in order to form the bulb. Therefore, onions are usually planted either as bulbs (called “sets” by growers) or as transplants. Once you understand how to grow onions from transplants, you will find that they typically have the best “keeping” or storage qualities. So if you are interested in how to grow onions specifically for long term storage, growing from transplants is definitely the best way to go.
You should start your onions indoors about twelve weeks before the last frost date, and plant the sets outside about six weeks before the last frost date. This will give the plants the head start they need to grow a good bulb. The seeds can be started within a fairly wide range of temperatures – anywhere from 65 to 80 degrees Fahrenheit (18 to 27 degrees Celsius). But once they have sprouted, it is important to make sure they are kept cooler for optimal growth – at around 60 degrees Fahrenheit (15 degrees Celsius).
Many backyard growers, including myself, have found that the most convenient way of how to grow onions is to start them from bulbs. This is by far the easiest way to grow onions. Simply plant the seeds very close together about six weeks before the last frost. Then, about three to four weeks after the summer solstice (around June 20th), pull the plants when the bulbs are no more than three quarters of an inch in diameter. Throw away the largest ones or else use them for pickling or in salads, because these will go to seed early if they are replanted. Lay your bulbs out in the sun (taking them inside when it rains) for seven to ten days to cure them, and then remove the dried out tops and store them just as you would any other onion. The following spring, six weeks before the last frost, plant the bulbs out at the optimal distance for the expected size of the particular variety of onion.
Starting from bulbs allows you to shorten the time to harvest in the second growing season somewhat because some of the growth has already taken place in the first growing season. This also has the advantage that you can be relatively confident that the onions you plant in the second season will grow successfully. Once you have learned how to grow onions this way, you can repeat it every year, growing some seeds to bulb among the bulbs you are growing to full sized onions. Repeat the cycle every year and you will have a constant supply of bulbs ready for planting.
3. Planting Onions
3a. Soil Preparation
 The first step in how to grow onions that are healthy is to make sure the soil has been properly corrected for the major macronutrients – nitrogen, phosphorous, and potassium – before you plant them. You should absolutely avoid any raw manures and only use very well matured compost. This is the case, by the way, for all root crops that will come into direct contact with the soil. Fresh manure draws pests, leaches nutrients from the soil, and probably worst of all, add their flavor to whatever is grown in them.
I highly recommend always double digging your beds, and this is especially the case when you are growing root vegetables. Double digging the beds improves the drainage and air circulation in them, and if you do it in the fall, you can be certain that the nutrients in the (well finished) compost you amend the soil with will be thoroughly integrated into the soil by the time you plant your seedlings or bulbs.
I have explained how to double dig beds in some of my other guides, and so I will only briefly recap the process here. Dig a trench along one side of your bed to about eighteen inches. Fill the bottom of the trench to a depth of about ten inches with well finished compost. Dig a second trench alongside the first one, filling in the first trench with the soil in the second. Fill the bottom of the second trench with compost to a depth of ten inches, and repeat the process, digging a third trench alongside the second one, filling in the second with soil from the first. Repeat the process until you have dug trenches parallel to one another the entire length of the bed. Fill in the last trench with soil from the first.
3b. Nutrients
The compound in onions that makes them pungent is a sulfur compound. Because of this, onions can be made to grow sweeter by depriving them of sulfur. This process, however, can make them keep poorly and be more susceptible to damage from pests. This is because sulfur is a crucial element in the production of certain amino acids, and amino acids are crucial to the structure of DNA, so developmental processes can be retarded by depriving the plant of sulfur. This is also why the well known sweet Vidalia onions can only be grown during a short time of the year, and why they are not available year round: the low sulfur soil in which Vidalia onions are grown makes them very poor keepers. So while you can make sweeter onions by depriving the soil of sulfur, you will do so at the expense of storage length.
Potassium and phosphorous are particularly important elements for how to grow onions that are robust and healthy, and you should make sure they are present in sufficient amounts before you begin planting. You can test the nutrient content of the soil by sending samples to a local county extension laboratory, which will provide a full report on both soil pH levels and nutrient quality, and will also make detailed recommendations for how to best go about amending the soil. If necessary, you can also add potassium and phosphorous later in the growing season as a side dressing (in the top layers of the soil surrounding the plant) by adding wood ash, green sand, bone meal, or other K- and P- rich compounds. Nitrogen, which is also a key part of the formation of amino acids, is also very important and has to be present at adequate levels at the start of the growing season. On the other hand, nitrogen should not be added to the soil later in the soil, as doing so can cause delays or otherwise inhibit the formation of large bulbs in favor of excessive growth of the plant’s foliage. This is an example of where slow release, organic forms of nitrogen such as alfalfa meal have a distinct advantage over chemical fertilizers that can be easily leached out of the soil while you are watering.
3c. pH
Onions typically taste better when they are grown in sweeter or less acidic soils that have a pH level between 6 and 6.8. After you have tested the pH of your soil, either with a home kit (these are available at home and garden centers or online) or gotten a measurement as part of the extension lab’s report, you may find that you need to amend the soil pH. If you do need to raise the pH of the soil, you can do so by adding lime in either a pelleted, dolomitic, or powdered form. However you should do this well in advance of the growing season, because it will take months for lime to affect the pH level of the soil. Therefore it is best to apply lime in the fall. If, in the spring, the soil pH is still too low (and I do recommend testing it both at the end and start of the growing season), do not worry too much. You can use a mixture of powdered lime, which will act slowly, and wood ashes, which will act quickly, to raise the soil pH. These should be tilled into the upper six to eight inches of the soil very thoroughly. Wood ash contains a compound called potassium hydroxide (or wood lye), which is very corrosive and can be toxic to plants in heavy concentrations, so be careful not to over-apply it to the soil.
One other reason why it is important to prepare the soil in the fall – from double digging to pH adjustment – is that onions will be one of the first crops you plant in the garden. Working the soil eight to ten weeks before the last frost can be difficult work. It will probably still be fairly cold out, and doing garden work in freezing temperatures is no fun. This can also mean that the soil will be hard to work, and while you may need to till the upper few inches of the soil in order to break it up enough to work it, it is not a good idea to double dig in cold weather, as this will inhibit the dissemination of nutrients into the soil. Therefore I highly recommend preparing your bed for planting at the end of the prior growing season, rather than at the beginning of the planting season.
4. Maintenance: Weeds, Disease, and Pests
4a. Weeds
 One of the biggest challenges when you are learning how to grow onions, particularly early on in the growing season, is the onions’ vulnerability to weeds. This is due to the fact that onions are a slow growing vegetable and can easily be choked out by weeds if they are not controlled. This can be an especially difficult problem because of the fact that distinguishing between onion greens and blades of grass can be hard if you are not used to them. As a result, onions are a particularly important case for applying prevention as the best medicine for weed control.
For beds that you will be using to grow onions, soil solarization is a very effective strategy. Soil solarization is a fancy term for using the sun’s energy to kill off harmful bacteria, pests, and especially weed seeds and seedlings in the soil. In this method, you simply cover the soil that you wish to solarize with a transparent plastic tarp that traps the sun’s energy, heating up the soil and cooking weed seeds and seedlings. This process denatures the cellular structure of the weed seeds and seedlings and kills them. This requires some planning in advance, because it is most effective in July and August when the sun is at its hottest.
Once your onions are already growing, it is also important to check the bed regularly and immediately pull any weeds that do begin to grow. Once the onions have become established to a height of more than three or four inches, mulch around them heavily to prevent sunlight from reaching any weed seeds that may still be viable in the bed, or that may have been deposited there by wind or animals. Be sure that you remove the entire weed, down to and including the root, as many weeds can grow back from their root structures alone.
4b. Diseases
While diseases are not typically a problem when you learn how to grow onions in the home garden, onions are vulnerable to a number of fungal and bacterial diseases that can be spread through the soil. The most notable ones are sclerotinia, botrytis, and pinkroot. Primary prevention for these diseases is crop rotation, with sun solarization being an excellent deterrent as well.
Sclerotinia of onions is apparent when small dark spots are on the blades; these can expand to kill the entire blade and infect others. The organism responsible is C. homoeocarpa, which is the same organism that causes dollar spot on turf grasses. Therefore it is important to keep turf grass at least three to five feet away from your onion bed. You can use bark mulch or similar mulching to prevent grasses from approaching the beds, and this will help prevent the spread of the disease.
Botrytis looks like small white or yellow spots on the blades of the onion. These spots also appear sunken. Successful infection will typically kill your onions in about a week. Although the spores of this disease are generally about in the average garden, the most common source of infection is debris from the previous year’s crop left on the bed.
To prevent these diseases from attacking your onion crop, there are a number of steps you can take. Rotate your crops so that onions are not grown in the same bed more than once every three years. Clear and compost all crop debris at the end of the season so that spores have nowhere to overwinter. Avoid disturbing the soil or onions during damp or wet weather.
4c. Pests
Most insects do not like to eat onions, because when onion tissues are injured, they release a compound that upon contact with water releases sulfuric acid. This is why your eyes burn and water when you cut onions. But there are a couple of insects who do not seem to mind the onion’s natural defense mechanisms.
Thrips are a rather common garden pest. They are tiny; the winged adult is no more than a tenth of an inch long. The thrips can damage your crop in two ways: first, through the direct damage they do by eating the crop, and more importantly, because the tiny cuts they make will provide an entry for botrytis. A thrip infestation, along with a week or so of cold, wet weather can doom your entire crop. Thrips plant their eggs in batches of ten to 100 in the leaves, and when the eggs hatch, the larvae can do considerable damage to the plant. Thrips are not unique to onions and will eat almost anything grown in the garden, so crop rotation does not help.
Prevention requires a combination of proper cover crop selection, control of vegetation, maintaining the right soil fertility, and good garden hygiene. Clearing crop debris at the end of the season in order to reduce overwintering populations of thrips is also extremely important. Their eggs cannot survive the high internal temperatures of the composting process, so it is equally important to compost or destroy (or throw away) debris from your garden. Mulch heavily in and around beds to keep weedy vegetation away in order to further reduce thrip populations. Thrips have a preference for wheat and rye, so if you are using a cereal grain as a late season cover crop, plant oats instead. Lastly, a number of studies have demonstrated that lower than optimal levels of calcium as well as trace minerals can make the garden more susceptible to thrip infestation, so making sure you add adequate amounts of lime as well as sea minerals is a wise practice. Likewise, too much nitrogen can be a risk factory, so make sure you maintain optimal fertility and nutrient content of the soil to keep thrips away.
In addition, you can use predators to hunt for thrips in your garden. Predator nematodes and thrips predatory mites are particularly effective in controlling thrips. Both of these are available to order online. Apply predator nematodes to the soil while you are watering by adding them to water sprays. Thrips predator mites are effective if your region experiences high humidity levels (70 – 80%). Sprinkle a few hundred predator mites on the foliage of each plant, and they will attack any thrips that are present.
If efforts towards prevention fail and your crops are experiencing severe damage from an infestation, you can apply one of a number of natural insecticides that have been shown to be reliably effective against thrips. These include pyrethin with rotenone, Hot Pepper Wax, and others. Be sure you are correctly following the directions on the insecticide’s label, especially safety precautions.
The other likely pest problem will be onion maggots, which are the larvae of a fly that lays its eggs near the plant’s roots. The first symptom you will probably see is wilting plants. When you dig them up, you will find your plants have become a rotten, putrid mess. Once an area has become infested, it will most likely remain so. This is an area where prevention is especially important. Meticulous attention to hygiene in removing debris, soil solarization, and the application of predatory nematodes will help. In addition you can avoid the white onion varieties, as these are the most susceptible to onion maggots. But of these actions, the efficient removal of onion debris, including making sure you do not leave any onions in the ground, is the most important. Onion maggots that are overwintering need onion plant matter to survive; removing onion debris and mixing it into your compost pile will significantly reduce their numbers.
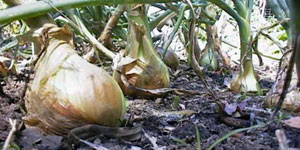
5. Harvesting Onions
 The last part of my guide on how to grow onions is perhaps the best part: the harvest! You can pull and eat an onion at any stage of growth. But if you are learning how to grow onions for long term storage, you should harvest them when the bulbs are mature. This is usually indicated on the catalogue listing or seed packet as “days to harvest.” If you are planting your onions in the garden bed six weeks before the last frost, as recommended, generally they will be mature anywhere from late summer to late fall. Onions are mature and ready for harvest when the tops of the majority of them have weakened, turned brown, and fallen over. When this happens, you can go ahead and bend over the remaining tops, and then allow the onions to stay in the ground for the next five to ten sunny days. When harvest day arrives, pull up the onions in the morning and leave them outside, sitting in the sun, until the evening. This will kill the small roots at the bottom of the bulb. Then bring the onions out of the elements into an area that is shaded, protected from the rain, and has good air circulation. A screened in porch is the ideal place for this. Leave them there for a couple of weeks, turning them regularly. This will ensure that you have fully cured the onions, bringing them to optimal storage quality.
Whole onions should be stored either by braiding them or by stacking them in mesh bags that have good air circulation and kept in a cool, dark, dry place. I have saved the mesh bags from the grocery store to use for storing the onions I grow in my garden. It is important that you do not let your onions freeze. If you want to freeze your onions raw, it is important that you first peel and slice them into quarters, and then place them in freezer bags with as much air as possible removed. You can also successfully dehydrate onions (with or without blanching first), but they can discolor when you dehydrate them unless you treat them with vitamin C first. To do that, dip them in a bowl containing two cups of water and two tablespoons of lemon juice. The discoloration will not affect the quality or taste of the onions, but can make them unattractive. Finally, you can also pickle onions in vinegar for preservation, but be sure you use a water canning method, as they will fall apart into a mush mess if you pressure can them.
And now you know all there is to know about how to grow onions! I hope you are as excited to start exploring how to grow onions in your own backyard as I am every year when I pull a harvest out of mine. Onions are a wonderful, relatively easy crop to grow in the backyard, and they are so versatile in the kitchen and easy to store that they will reward you year round. Now that I explained everything I know about how to grow onions, you just have to get started!