How To Grow Green Beans
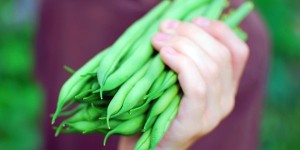 Learning how to grow green beans is a great experience for any gardener, whether you are an expert or just getting started on your first vegetable garden.
There are an astonishingly wide variety of beans that you can grow, and so you will certainly be able to find the cultivar that is right for you.
Because it is so easy to learn how to grow green beans, teaching kids how to grow green beans can be a great way to introduce them to the wonderful world of vegetable gardening.
In this guide on how to grow green beans, I will begin by teaching you a bit about the history and culture of green beans in the section “All about Green Beans.” This section will also include a list of some of my favorite varieties of pole beans and bush beans, with recommendations for which kinds are best to try if you are just learning how to grow green beans for the first time.
Then, I will talk about the first step of how to grow green beans in the section “Planting Green Beans.” This section will explain how to properly prepare the soil in your garden bed for how to grow green beans, as well as what kind of pH is best for green beans. I will also discuss whether to start green beans indoors or plant them directly in the soil and when you should plant green beans. Finally, I will discuss the practice of companion planting for how to grow green beans along with other vegetables, and trellises and other support structures for pole type green beans.
Next will be a section on maintaining your green bean patch that includes advice on how much water to give green beans, and how to best deal with weeds, pests, and diseases that could present a problem for your green beans.
Okay! Are you ready to learn how to grow green beans? I sure am! Let’s get started!
1. All about Green Beans
 Beans are one of the most versatile vegetables you can grow in your garden. They can be used to replace nitrogen in the soil, eaten fresh as green beans, and made into everything from soups and stews to baked beans.
The variety of beans available across species is really quite amazing, with literally hundreds of varieties available from traditional cultures as well as more modern breeds. There are seed catalogues that offer more than one hundred varieties, which is truly impressive. But in spite of this diversity, which is made possible by devoted seed savers, the reality is that most beans that are available at the grocer have come from only a few different cultivars.
In addition to that, beans are often grown in the same fields year after year, which forces commercial farmers to use inorganic methods such as pesticides and large amounts of chemical fertilizers. To compound the issue, due to various market forces stocks of dried beans are sometimes a few years old – or more. Unless you live in a rural area and are friends with a farmer, or have access to a farmers’ market, the best way to ensure you have good, organically grown beans is to learn how to grow green beans yourself. Fortunately, learning how to grow green beans is one of the easiest things a gardener can do.
The common green bean (Phaseolus vulgaris) includes a large number of different types which are called by many names. Those beans grown for the immature pod are known variously as snap beans, Romano or Italian beans, garden beans, green beans, string beans, French Horticultural beans, or wax beans. The common bean originated in Central America and was widely distributed by indigenous peoples of North and South America, who were the first people to learn how to grow green beans. The indigenous people ate the beans primarily in the green shell or dry bean stage.
The original snap beans were rather stringy, hence the name string bean. Early American settlers introduced the snap bean to Europe. Within the past forty years, the common bean has been almost entirely redesigned by plant breeders, and with the exception of heirloom varieties conserved by seed savers, few cultivars available before the 1950s are still around today.
1a. Varieties of Green Beans
Green beans can be separated into types of cultivars in a number of different ways, but for most backyard gardeners they can be categorized based on the plant’s physical characteristics, such as whether they are bush beans or pole beans, and how they are used in the kitchen, or whether they are used fresh as green beans or allowed to grow into dry beans. But they can also be categorized by even more distinctions such as whether they are lima beans, cow peas (also known as black eyed peas), yard long beans, and many, many more. But because of the fact that green beans will grow fairly easily anywhere in North America, the most important point to consider when you are deciding which variety you want for how to grow green beans in your backyard is your personal taste. While this guide is primarily focused on how to grow green beans, the advice I provide here can also be applied to any other kind of bean, as they all are grown very similarly.
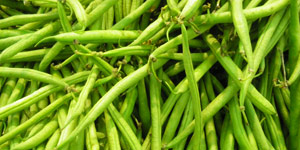
When beans are grown fresh and contrasted with store bought green beans, you will soon notice a very big difference in flavor and texture that is simply unavailable in supermarket green beans. A green bean is certainly not only a green bean. For example, there is a huge dissimilarity in flavor and texture between, say, the Blue Lake and Kentucky Wonder cultivars. You may even find out that, like in my house, different family members prefer the taste of different varieties. The best plan of action when you are learning how to grow green beans is to grow more than one green bean variety every year. This way, you can continue to sample new cultivars while you also produce the cultivars you have found that you like best. Also, by growing a combination of green and dried bean cultivars, you will have a wide variety available for your kitchen all year long.
There are many cultivars of green beans. When you are learning how to grow green beans, you can choose between the bush type and pole type; between green, yellow, and dry bean cultivars. Italian or Romano beans produce large, flat pods that have a distinctive flavor. Horticultural or French Horticultural beans are large seeded beans that produce colorful pods. The pods are striped and mottled in red. These beans are usually used as green shell beans.
Royalty is a bean that has a purple pod. This cultivar is a selection from seeds handed down through the years by a family of New England gardeners. It will germinate and grow in cooler soil than regular bens, and it is less bothered by bean beetles. Royal Burgundy is another bean variety that has a deep purple pod.
Instead of telling you precisely what you should learn to grow first, I will just provide a list of some of the cultivars that I have grown and liked. You can use this list as a beginning point for your own path of bean discovery.
Blue Lake Green Beans (Green Pole): There are a number of different cultivars of this green bean, including Oregon Blue Lake and California Blue Lake, and some of them have a wide range of resistance to diseases. Has a mild flavor. Sixty days to maturity.
Kentucky Wonder Green Beans (Green Pole): This is a really prolific pole bean that will produce seven inch long beans as long as you continue to harvest them. It has strong vines that will keep beans off the ground. It can be grown either for fresh green beans or for dried beans. Kentucky wonder has a distinct flavor and is great for canning or freezing. Fifty-seven days to maturity.
Tender Crop Green Beans (Green Bush): This variety has crisp, six inch, tender, meaty pods that do not have strings and that grow high off the ground. The tan seeds are mottled with purple spots. This variety is resistant to Bean Mosaic and Powder Mildew. Fifty-six days to maturity.
Midnight Black Turtle Green Beans (Dry Bush): This is an excellent variety of this South and Central American cultivar. The tall bush keeps the bean pods high off the ground. While it is less productive than some other varietals, it has a very distinctive flavor that makes it perfect for spicy soups, stews, and refrying. Ninety days to maturity.
Light Red Kidney Green Beans (Dry Bush): This is a great dry bush bean to grow for using in three bean salads, chili, and soups. The medium sized bush keeps the bean pods sufficiently high off the ground. Ninety-five days to maturity.
Burpee Improved Green Beans (Bush Lima): These are larger than other lima bean varieties, such as Fordhook or Henderson’s. The pods grow in clusters of three to five pods. Lima beans can be one of the more difficult beans to learn how to grow, especially because they need to be harvested when they are big but while they are also still immature. Seventy-five days to harvest.
2. Planting Green Beans
 In this section I will discuss several aspects of the first step in how to grow green beans: planting them. This section will cover culture of green beans; preparing the soil for how to grow green beans; whether to start green beans indoors or plant them directly in the soil; when to plant green beans; companion planting for how to grow green beans with other vegetables, and trellises and other support structures for green beans.
2a. Culture of Green Beans
Green beans are a warm season crop and can be grown in all parts of the United States and most of Canada. They should not be planted until the soil has warmed up. In the South and Southwest United States, you can learn how to grow green beans during the fall, winter, and spring. In the Deep South, you can learn how to grow green beans throughout the winter. During overly hot, dry, or wet weather, the plans often lose the flowers or pods. Green beans grow best between temperatures of seventy and eighty degrees Fahrenheit and need about one inch of water every week.
Beans are legumes and as a result they enjoy association with bacteria that convert nitrogen from the air into a form the plant can use. These bacteria can be purchased in a pea and bean inoculants, available at garden centers and online. If the area has never grown beans or peas before, some of this inoculant can be dusted onto the moistened – but not soaked – seed. If the area has grown beans before, it is usually of little value to add additional inoculants. Beans therefore require less nitrogen than some other vegetables, and if they are planted after some other early vegetable is harvested, the residual fertilizer is usually enough. Heavy applications of manure or fertilizer high in nitrogen can induce a large amount of vine or bush growth but often will delay the maturity and yield of the bean pods.
2b. Preparing the Soil
Green beans will grow poorly if the soil in your garden is overly acidic, so it is important to test the pH of the soil and correct it, if necessary, to a pH between 6.5 and 7.0 the year before you plant them. Soil testing kits are available at most garden centers, or you can opt to send soil samples to an extension lab, which will test the soil’s pH as well as its nutrient content, and provide you with a full report on both, as well as suggestions for soil amendments. Of course, the amendments will be different for different garden beds that have various vegetables in them – tomatoes prefer more acidic soil, for example.
You can raise the pH of your soil so that it is less acidic a few different ways. The best ones involve adding pelleted or dolomitic lime to the soil. Till the lime into the soil while you are double digging the beds, and be sure to enrich the soil by adding plenty of compost as well. Make sure the soil has plenty of potassium and phosphorus. Nitrogen is less of a concern, because the beans will make their own nitrogen, which they will then pass on to the soil.
As always, I highly recommend constructing raised beds for your beans. Raised beds improve air circulation in the soil as well as drainage, but more importantly for green beans, they allow the soil to warm up faster than below ground soil. If the average soil temperatures in the garden bed are below sixty degrees Fahrenheit, the germination of the green beans will be suboptimal. You can either construct a raised bed with four walls that you then fill with soil to a depth of twelve to twenty four inches, or you can simply mound a mixture of well finished composed and topsoil over your garden bed until it is about eighteen inches high at its peak. This will also increase the total surface area of your garden bed, allowing you to plant more vegetables in the space than you otherwise could.
2c. How To Grow Green Beans Indoors
Green beans are one of the easiest seeds to start, and you can start them indoors with a fairly simple procedure. In fact, germinating a lima bean or any other bean is a great activity to do with kids, because it allows them to witness seed germination first hand. Using this activity, you can teach kids some basic lessons about plant life. For this activity, you’ll need a few lima beans, a paper towel, and a plastic sandwich bag.
Soak the lima beans overnight. Moisten the paper towel until it is damp, but not soaking wet. Then place a few of the Lima beans in the paper towel. Fold the paper towel over the seeds so they are snugly covered. Place the damp paper towel with the seeds in the plastic sandwich bag. Leave the sandwich bag in a warm place. Check on it after a day or two to see if the seeds have started sprouting. Make sure the paper towel stays evenly damp. After a few days you should see some growth. Talk to your kids about the conditions needed to germinate the seeds. You can also experiment with different conditions. Place some seeds in a dry paper towel along with those that are in a moist paper towel, and ask your kids which ones they think will germinate and why.
Whether or not you decide to do this activity with children, you may decide to get a head start on the growing season by starting your beans indoors. You do not necessarily have to start your beans in the manner described above; that method is primarily designed so that kids can see how the seed develops into a germinating plant. Instead, you can plant beans in biodegradable pots about a week or so before the last frost date, and then plant these directly into the garden.
2d. Direct Sowing of Green Beans
Of course, green beans are prolific growers, so starting them indoors is not entirely necessary. If you choose to plant them directly in the soil, plant each seed exactly one inch deep, and space them about one or two inches apart. Pole beans and bush beans do not mind being crowded together, so while you may find that you will need to thin them somewhat as they mature, this close company will not harm them.
Bush type beans should be planted one or two inches apart in rows that are eighteen to thirty inches apart. You will eventually have to thin bush type beans to tow to four inches apart. Pole type beans should be planted in rows two to four feet apart, near a support structure (more on that in the next section). Pole beans can also be planted in hills three feet apart with six seeds per each hill. The hill is then thinned to four or five plants, and a support structure is built over the hill.
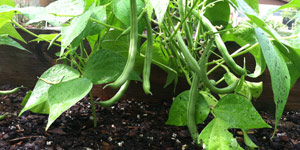
2e. Trellises and Vertical Gardening
Pole beans will need some sort of support structure to grow on. There are a number of different options for this, and the one you choose is dependent on the amount of space you have available to work with, the amount of effort you want to put into it, how many plants you are growing, and how functional versus how aesthetically pleasing you want it to be.
The easiest method for trellising pole beans is to plant them in a hill as described above, and then place three or four stakes around the base of the hill, tying their tops together to form a teepee or wigwam structure. If you are growing a number of pole bean plants in rows, then I recommend building what is called a post trellis. The post trellis is constructed by driving stakes or posts that are six to eight feet long into the ground, and then attaching a crosspiece to the tops of them. You can then run twine from the top of the post trellis to stakes that are pushed into the soil, and then form a grid of twine by interweaving lengths of twine through the upright lengths of twine at intervals of about a foot each.
Alternately, you can use preexisting structures in your garden to train pole beans on. If this is your first year learning how to grow green beans, you may decide that you do not want to construct an elaborate structure for them to grow on. Green beans will readily attach themselves to whatever structure they can find, so if you plant them close to a wrought iron or chain link fence, they will certainly make use of it. Wooden fences can be a bit trickier, as they will have a harder time grasping on to them.
For certain varieties of pole beans, it can be a very good idea to build a trellis that slants, such as the teepee structure discussed above. Certain varieties can grow to be as much as nine feet tall, which can make building a tall enough trellis, as well as harvesting them, quite difficult. But if you build a trellis that is angled so that you can reach the top of it, both of these problems are solved.
2f. Companion Planting
Another really wonderful way for how to grow green beans is called companion planting. Companion planting is simply the practice of planting several different vegetables together in such a way that they benefit from one another’s presence. They can be planted together so that one provides shade for the other, or so that one attracts pollinators to the other, or so that one repels pests from the other. Green beans are uniquely suited to companion planting for several reasons.
First of all, because green beans replace nitrogen in the soil, it is a great practice to plant them along with other plants that need a good amount of nitrogen. If you do this, you will save on the amount of fertilizer you need to provide to your vegetable garden bed. Vegetables that need a lot of nitrogen include beets, Brussels sprouts, cabbage, potatoes, Swiss chard, and leeks. Of course, just about every other vegetable you plant in your garden will need some nitrogen, so this benefit will be afforded to any one you decide to plant green beans near.
Second of all, because pole type green beans need a trellis on which to grow, there are two plants in particular that are excellent additions to your pole type green bean garden bed. These are corn and tall sunflowers. Planting a few pole type green beans around each stalk of corn or tall sunflower will allow them to grow on a living trellis. The result, especially if you use sunflowers, is a stunningly beautiful natural trellis for your garden.
There is a particular method of companion planting that was developed by the indigenous peoples of North America (in particular, the people of the Iroquois Nation) for how to grow green beans. They grew corn, pole type green beans, and squash together in the same garden bed. The corn, as I have mentioned, provided a living trellis for the green beans to grow on. The broad squash leaves provide a natural mulch by shading out weeds and the spiny vines of the squash also discourage pests from approaching the corn and beans. And the green beans not only provide nitrogen to the soil for the corn and squash, but also helped to support the corn stalks and prevent them from blowing over in high winds. The Iroquois called this planting method the Three Sisters.
If you would like to learn how to grow green beans using the Three Sisters method, I will explain how to do it. First, choose a site that receives full sun. Amend the soil with lots of well aged compost or manure. With a string, mark off three rows that are ten feet long and five feet apart. In each row, make mounds for the corn and beans. Each mound should be eighteen inches across with a flat top, and the center of each mound should be five feet from the center of the next mound. Plant four corn seeds in each mound, in a six inch by six inch square. When the corn is six inches tall, plant the bean seeds. Plant four to six bean seeds in a square around the corn seeds. In between the corn and bean mounds, build mounds for the squash that are the same size as the corn and bean mounds. Plant the squash at the same time that you plant the corn. When the squash seedlings emerge, thin them to only two plants per mound. You will have to weed the area until the squash develops trailing vines and large leaves. And that is it! Now you know how to grow green beans in the method that was used by some of the first people to cultivate them.
3. Watering, Weeding & Harvesting Green Beans
 In this section I will cover the basics of maintaining your green bean patch. There are a few simple concerns, such as how to best keep down weeds, how much water to give green beans and what method to use for watering them, and how to prevent and minimize the spread of pests and diseases in your garden.
3a. Water
Green beans grow best with about an inch of rainwater or the equivalent per week. As with any vegetables you grow in your garden, it is important to keep track of the daily, weekly, and monthly rainfall the garden receives. This way you can figure out exactly how much extra watering your garden needs. If you are lucky, it will rain almost every week in your area, which should significantly cut down on the amount of watering you need to do. Because I believe in hand watering my vegetable garden, I always see rain storms as a blessing in disguise, because it means I will have to do less work that week.
The best way to keep track of the rainfall your garden is receiving is to keep a rain calendar and also to get a rain gauge and check it after every rainstorm. A rain calendar is any old calendar; I keep mine hanging on the porch where I store my garden tools. A rain gauge is a plastic or metal device that measures rainfall in inches. After it has rained, I check the rain gauge and write down the amount of rainfall on my rain calendar. That way I will know whether the garden needs watering that week.
As I said, I am a strong advocate for watering by hand. As I have mentioned in my other guides, I do not like overhead sprinklers because they waste water, have the potential to damage plants, and do not allow me to keep track of how much water my garden is receiving when I water it. You can water by hand using a hose with a misting attachment, which makes it a bit easier, or you can do it the old fashioned way (like I do) by filling several watering cans and bringing them to the garden in a hand cart or toy wagon.
Mulching your garden heavily with well-decomposed compost, dried straw, or wood chips will also help the soil retain moisture longer, which will mean that you will not have to water as much. Alternately, if you grow pole beans using the Three Sisters method, the leaves of the squash will help keep the soil shaded, which will cut down somewhat on water loss to evaporation.
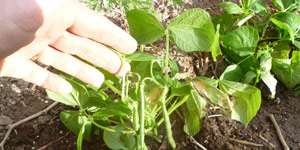
3b. Weeds
Weeds will not really be much of a problem if you are growing bush type beans in garden beds, because the bush beans will sprout and grow rather quickly and the leaf cover they will provide will effectively shade out any weeds that offer competition. All you have to do is keep any grass that is growing around the bed trimmed and make sure the bed is prepared and weed free prior to planting.
For pole beans, the best way to keep down weeds is to use the Three Sisters method described above, as the squash leaves will shade out any competition. Otherwise, just check your garden bed for weeds regularly, and completely pull out any you do see. Pulling weeds (or using flame weeding methods) is the best method to use in vegetable gardens: I advise against using any kind of weed spray, as these can inadvertently damage your crops, and any chemicals that get into the soil have a fair chance of winding up on your dinner table.
3c. Harvest
Beans should not be handled or harvested when they are wet, as this can help spread disease. Lima beans should be harvested when the pods are filled and are light green in color, or creamy white for butter bean types. Green beans and yellow snap beans should be harvested when the pods are still young. The seeds will be small, the pod interior will be firm, and the fiber content of the pod will be low. Beans should be harvested every few days as mature pods are of poor quality.
4. Pests and Diseases
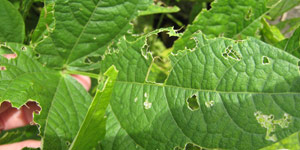 The two major pests that you are likely to see in a bean patch are bean beetles and Japanese beetles. Japanese beetles start as tiny grubs in your lawn. If you have a lot of property so there is a fair amount of buffer space between your lawn and that of your neighbor’s, you can treat your entire lawn and garden beds with milky spore disease. This can be an excellent deterrent to Japanese beetles after the milky spore disease has become established after a year or two. There are also Japanese beetle traps available, but it is important that you place these downwind of your garden and at least thirty yards away from it, or else you may run the risk of attracting more Japanese beetles to your garden than you eradicate.
Japanese beetles also attract one another, so there is a great method of controlling them in which you pick them off your beans when you see them and drown them in a bucket of soapy water. If you keep picking them off daily once you have noticed them on your plants, you will most likely prevent them from becoming a bigger problem. You can also control them with organic pesticide sprays like rotenone, although these sprays can be rather expensive, especially if you have a big vegetable garden.
Bean beetles spend the winter in the debris from the previous year’s bean crop. Therefore it is very important to prevent their residency by clearing out your bed at the end of the growing season and composting all of the plants in it. Bean beetles appear as large bronze lady bug shaped beetles. They lay yellow eggs on the undersides of the bean plants’ leaves. The eggs hatch into small yellow grubs. Both the adults and the grubs will feast on your bean plants’ leaves as well as the bean pods themselves. Bean beetles can be controlled by thoroughly cleaning the garden bed at the end of the growing season, destroying any eggs you find on the undersides of leaves, and removing adults and drowning them in a bucket of soapy water. You can also apply insecticidal soap or light horticultural oil to the undersides and tops of leaves to control for them if they become very problematic.
Disease usually is not a problem for when you are learning how to grow green beans. Bush type green beans are susceptible to certain kinds of white mold, but if you encounter this problem, the best thing to do is simply to switch over to pole beans. Planting Western cultivars or cultivars that are specifically bred to be disease resistant will also help to avoid this problem.
5. Final Word
And with that, you now know pretty much everything you need to know for how to grow green beans in your own vegetable garden. In this guide, we covered the history of green beans, and discussed different varieties of cultivars, their different characteristics, and which varieties are best to try out if this is your first time learning how to grow green beans. Then, we discussed preparing the soil for how to grow green beans, how and when to plant green beans, and how to grow green beans with companion plants or on trellises – constructed or made of living plants like corn and sunflowers! Next, we discussed maintaining your green bean garden bed, and techniques for keeping track of how much water the bed was receiving, weed control, and what to do if pests or disease strike the garden bed. Finally we discussed how and when to best harvest your green beans. Now that you learned how to grow green beans, you just have to get started!