How To Grow Broccoli
 In this guide, we are going to learn how to grow broccoli plants.
While figuring out the best dates for starting broccoli indoors – which you should almost always do – can be a bit complicated, other than that, learning how to grow broccoli is relatively easy.
It is lots of fun to learn how to grow broccoli, because broccoli is a big, beautiful plant, and you can eat broccoli raw, fry it, bake it, steam it, or even make it into broccoli coleslaw!
I will start my guide on how to grow broccoli with the section All About Broccoli, in which I will talk about a few interesting facts about the vegetable, and then explain the different categories of broccoli that are out there, and then recommend two of my own personal favorite kinds of broccoli that I grow in my vegetable garden.
Then, I will move on to the section Planting Broccoli. In this section, I will explain how to prepare the vegetable garden bed so that conditions in it are optimal for growing healthy, robust broccoli, including double digging the bed, tilling compost into it, making raised beds and adjusting soil pH. Then I will explain how to start broccoli indoors for both spring and fall plantings, and explain how to plant broccoli seedlings in your garden bed.
In the section that follows, Maintaining the Broccoli Patch, I will talk about important care practices for your broccoli, including how much water you will need to give your broccoli (and how to keep track of how much rainfall the broccoli patch is receiving); how to best control for weeds in the broccoli patch while seedlings are still young; and how to prevent and deal with a few common pests and diseases you may encounter while you are growing broccoli. I will finish up that section on how to grow broccoli by talking about everyone’s favorite part, harvesting your crops. I will also provide instructions on how to grow broccoli for seed, and how to save the seeds you glean from the crops.
So there you have it. This is a very thorough and comprehensive guide that has all of the information you will need to learn how to grow broccoli in your backyard. By the end of it, you will be a total expert on the subject. Are you ready to get started? Let’s go!
1. All About Broccoli
 In this section of my guide on how to grow broccoli, I will discuss some of the more interesting facts about the vegetable and explain the different categories of broccoli, which include heading broccoli, sprouting broccoli, Romanesco broccoli, rapini broccoli (or broccoli rabe), and broccolini, and recommend two of my personal favorite kinds of broccoli to grow.
Broccoli gained national attention in the United States during the administration of the first President Bush when famously he said that he did not like it, and went on to instruct White House kitchen staff to never serve it at any state dinner. But since that time, broccoli has made the news several dozen more times in a much more positive light, which might indicate that the elder statesman may want to revisit his position on the matter. These delicious vegetables have been in the news a number of times for their significant cancer fighting abilities.
Broccoli, along with other plants in its family, produces a chemical compound known as sulforaphane, which is a very potent antioxidant and cancer fighting machine. Along with this, broccoli is rich in fiber, vitamins, minerals, other antioxidants, and more. But the main reason they continue to be featured in more meals at our home than just about any other vegetable is the fact that they are not only delicious but also fairly easy to preserve in an appetizing state as well as easy to incorporate into meal plans.
Broccoli (Brassica oleracea, Italica group) is a member of the mustard family and its growth culture, as well as the difficulties associated with cultivating it, is similar to that of cabbage. Broccoli is also known as calabrese, Italian broccoli, and green sprouting broccoli. It was developed by farmers who originally learned how to grow broccoli by cultivating various leafy cabbage forms in southern Europe. It was brought to the Americas by early immigrants from that area of Europe.
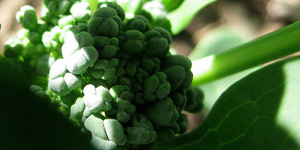
Sprouting broccoli is the type grown in most home gardens. The plant forms a loose flower head on a tall, green, branching stalk. The center flower head is from five to ten inches across, and the plant may reach up to three to five feet in height.
1a. Broccoli Variety Selection
The majority of varieties of broccoli will grow without any problems in most parts of the United States if they are planted during the correct time of the year. However, because they are a cool season crop that can tolerate most frosts, they will do much better at Northern latitudes. As long as the maturation date is no more than sixty days longer than the full growing season (and it should be noted that the majority mature far more quickly), that variety can be grown in your area.
Many people are not aware of the fact that there are several different categories of broccoli to choose from when you decide to learn how to grow broccoli. Typically, garden nurseries will only have one or two different kinds of broccoli available, but if you are willing to buy broccoli seeds and start the vegetables yourself, a much wider array of broccoli types can be available to use for learning how to grow broccoli.
Heading broccoli is the kind of broccoli that you are probably most familiar with. This is the one that you typically will come across in a supermarket or groceries, and it is the kind that many children, along with former President George H.W. Bush, dislike. Production farmers have tended to breed heading broccoli for durability and transport value, and have therefore inadvertently made into the rather bland and tough monster that it is today. It is not surprising that people want to avoid this kind of broccoli. Fortunately for us backyard vegetable gardeners, learning how to grow broccoli that is one of the heading varieties is quite different. They are very tender and richly colored, with deep dark green hues, and if it is grown during cooler weather in the fall it will be exceedingly sweet.
While the majority of heading broccoli varieties will present the same typical green look, it is a good practice to review the different varietals available in order to help you figure out which one is best suited to grow in your area and garden space available. There are also a number of varietals of heading broccoli that are purple, although these can be rather difficult to come across. If you do get an opportunity for how to grow broccoli that is purple heading, I urge you to jump at the chance, as it will not come along very often.
If the space in your vegetable garden is limited, you can learn how to grow broccoli varietals that can be grown in a mere eight inches of space, instead of the usual standard of eighteen inches of space. These cultivars are also ideal if you want to know how to grow broccoli in containers or on an apartment balcony or fire escape.
If you are learning how to grow broccoli in the Southern United States, or in the Southwest, where hot summers could present a problem, or if you are interested in how to grow broccoli in the spring and summer, there are varieties of heading broccoli that are more heat tolerant and thus better for these areas. These varieties will allow you a bit of a wider planting window if you get your seedlings off to a later start or if the summer heat comes in more quickly than usual.
If you want to know how to grow broccoli in Northern climates that are colder, or if you want to learn how to grow broccoli in the fall and overwinter the plants, there are varieties that are colder tolerant. These kinds of heading broccoli will help prevent buttoning in crops that you leave in the ground over the winter and will prevent an early frost from killing off a fall planting.
It is also a good idea to review the varieties you intend to plant in order to determine whether they will produce side shoots after the main stem is harvested, as there are a number of cultivars that are bred to only produce a main, central head of broccoli.
One of the less well known categories of broccoli is called sprouting broccoli, also called asparagus broccoli or calabrese broccoli. These are basically a kind of broccoli type that will only produce one small main head of broccoli, but will also grow lots and lots of shoots on the sides. Varieties of sprouting broccoli are available in purple as well as green hues. Occasionally people will incorrectly refer to these as “red broccoli” due to the fact that the purple cultivars can take on a somewhat reddish hue during the immature stages of growing, although they will ultimately grow into a purple vegetable.
Romanesco broccoli is one of the most unfamiliar categories of broccoli to many people. Romanesco broccoli is also sometimes referred to as brocco-flower or summer cauliflower. This is a variety that is great to cultivate if you are teaching children how to grow broccoli, due to the fact that it grows in a very unique fractal pattern that is very pleasing to look at and is sure to be something kids will have a lot of fun with. The flavor of romanesco broccoli is much milder than other kinds of broccoli as well, which can help introduce picky eaters to the broccoli world. This kind of broccoli is a very bright, light green color. It will typically mature in about seventy five days.
Rapini broccoli, although it is not technically a true broccoli plant, is nonetheless often referred to in seed catalogues as rabe or broccoli rabe. Rapini broccoli has become increasingly popular over the last decade or so, and this is largely due to the fact that it is quite commonly used in Mediterranean, Italian, and Chinese cooking. Rapini belongs to a sub-family of the turnip group of vegetables, but due to the fact that it resembles a sprouting broccoli vegetable, most people think it is in fact a kind of broccoli. The flavor of rapini when it has not been cooked is very bitter and rather pungent, so it is rarely ever consumed raw. However, if you simply sauté it in some garlic and unsalted butter it will lose its bitterness and be very tender and delicious.
Finally there is Broccolini, also known as Aspiration broccoli, which is a kind of broccoli that many people incorrectly think of as baby broccoli. In fact, broccolini is a kind of hybrid broccoli that is a cross between heading broccoli and a variety of Chinese Broccoli. The flavor of broccolini is also unique, and it is somewhere between the flavors of heading broccoli and asparagus. Broccolini seeds are very difficult to come by, and this plant is generally thought of as very difficult to cultivate in a home garden. However, if you can find brocollini seeds, want to learn how to grow broccoli that is unique and rare, and up for a challenge, by all means try it out.
Some of the best varieties to plant if you are just learning how to grow broccoli are, in my opinion, Atlantic and Waltham 29. Both are relatively early maturing and form a fairly compact head with a very sweet flavor. Both of these varieties also produce a lot of side shoots once the main head is cut off and have a very classic broccoli taste. I typically plant Atlantic in the spring and Waltham 29 in the fall. I have had great results with these two varieties year after year, but you may wish to plant a different varietal depending on your area and your particular tastes.
2. Planting Broccoli
 In this section of my guide on how to grow broccoli, I will explain how to prepare the vegetable garden bed so that conditions in it are optimal for growing healthy, robust broccoli, including double digging the bed, tilling compost into it, making raised beds and adjusting soil pH. Then I will explain how to start broccoli indoors for both spring and fall plantings, and explain how to plant broccoli seedlings in your garden bed.
2a. Preparing the Soil
As with many other hardy types of vegetables, preparing the soil correctly is one of the most important steps for how to grow broccoli. Soil pH should be adjusted to 6.5, and the soil should be generously amended with compost as well as for sufficient levels of all of the major nutrients. While you can test soil pH with store bought kits yourself, to prepare a bed for how to grow broccoli, I highly recommend sending soil samples to a local extension lab in order to obtain a thorough report of the soil nutrient quality – in particular boron. Broccoli is very sensitive to boron deficiency, so it is important that you pay very close attention to the amount of micronutrient supplementation in the bed. It is also always a good practice to double dig the bed and till plenty of well finished compost into it. If you are working with limited space, I recommend building raised beds that are mounded in the center, as this can increase the total surface area of a garden bed by as much as one and a half times. Finally, make sure the bed is completely free of weeds before you plant your seedlings.
2b. Starting Broccoli Indoors
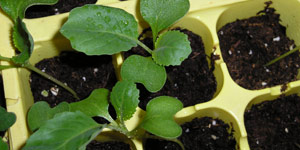
If you are learning how to grow broccoli in the spring, you should start your broccoli indoors eight weeks before the last frost date is expected, and plant them outside before the last frost date. Broccoli can be planted outside a little bit later that that (if you want to) without harming it, but if you delay too long, it may not produce as big of a main head as it otherwise would.
If you are learning how to grow broccoli in the fall, the timing of the planting is a little bit more complicated, but fairly easy to understand. Mark the date of the first frost in fall on your calendar, and then mark the date that is thirty days after that. Then, count backwards from the second date by the number of days to maturity for the variety you intend to plant, adding another ten days to that amount to make up for the loss of sunlight in the fall. The day you land on is the day you will want to be planting seedlings outside. Count backwards five more weeks from this date: that will be the day you want to start your seeds inside for fall planting.
So, the first frost date where I live is October 24, and I want to plant Atlantic broccoli, which matures in sixty days, so my projected harvest date is November 24. The transplants should be planted outside 60 days plus ten days beforehand, which is September 15. I will need to start my seeds indoors five weeks before that date, which is on August 11. You can also use this method for any other frost tolerant vegetable that you want to grow in the fall.
2c. Planting
Broccoli plants can get fairly large, but they nevertheless can still be spaced fairly close together in your garden bed. Doing this is a great way to naturally shade out weeds. In fact it is typically very rare for me to have more than a couple of weeds in a bed of broccoli. So space the plants out every twelve to eighteen inches. This can allow you to have as many as thirty two plants in a single four foot by eight foot bed, and even more if you have mounded the soil to make a raised bed.
Like many other vegetables, broccoli needs plenty of sun in order to reach its maximum growth and production potential. Plant your broccoli in an area that receives at least ten hours of full sun every day during the growing season. You should take note that this could be in different locations depending on whether you are growing a spring crop of broccoli or a fall crop of broccoli, and plan accordingly. At the same time, it is very important that you make sure you transplant the broccoli seedlings on an overcast and relatively cool day so as to be sure that you do not subject them to too much stress. Transplanting is in itself a stressful time for the young plant, so it is crucial that you minimize any stressors wherever possible.
Early in the growing season, the availability of nitrogen in the soil will not be very reliable because the soil temperature can still be too cold for microorganisms that produce nitrogen to work. (Planting a raised bed has the added benefit of allowing soil temperature to warm up faster than it otherwise would, which will help with this issue.) Because broccoli is a rather heavy consumer of nitrogen, you may see symptoms of nitrogen deficiency rather early on in the forms of yellowing leaves. This can be prevented fairly easily simply by watering spring transplants very heavily every two to three days with fish fertilizer – or any other fertilizer that is rich in nitrogen – until they are well established and any danger of frost has passed. Also, if you are in the habit of rotating your crops through your different garden beds, you can help this problem by planting broccoli one year in a bed that had green beans growing in it the previous year, as green beans are associated with nitrogen fixing bacteria.
3. Maintaining the Broccoli Patch
 In this section of my guide on how to grow broccoli, I will discuss how often you will need to water your broccoli, how to best control for weeds in the broccoli patch, and common pests and diseases you may encounter while you are growing broccoli. I will round out this section on how to grow broccoli by discussing the best part – harvesting your crops.
3a. Water and Weeds
Broccoli needs a steady supply of even moisture in order to really thrive and produce robust, big heads. This is true whether you are growing Heading broccoli, Sprouting broccoli, Romanesco broccoli, Rapini broccoli, or Broccolini. While your broccoli is still immature and too small to provide a shade mulch to the garden bed, it is a very good practice to spread an organic mulch made up of well-finished compost, ground up leaf litter, chopped up straw, or finely ground up bark and wood shavings on the bed. This will help to keep the soil cool and retain moisture as well as keep down weeds.
As long as you have prepared the bed and ensured that it was free of weeds before you planted your broccoli, once the plants have become established, their large leaves and close proximity will shade out most weeds and cause them to have difficulty growing. While the plants are still small, you can remove any weeds between them by hand or with a small stirrup hoe (sometimes called a Hula hoe). When they are bigger, just pull the occasional weeds you do see by hand.
It is important that the broccoli patch receives a steady supply of one and a half inches of water per week. As I have mentioned in previous guides, it is a good practice to buy a rain gauge and keep track of the daily and weekly amounts of rainfall your garden is receiving on a rain calendar. By doing this you will be able to calculate exactly how much water you should be providing in addition to rainfall. As I mentioned above, it is a good practice to water the garden with a liquid fish emulsion or other nitrogen rich fertilizer mixed in.
As always, I recommend watering your vegetable garden by hand. Overhead sprinklers are especially bad for big, leafy vegetables such as broccoli, because water droplets can collect on the plants’ leaves, and on sunny days, they will concentrate the sun’s rays and potentially burn the leaves. If you have the time, money, and wherewithal, installing a below ground watering system is a great alternative to overhead sprinklers. You can also run drip hoses through the vegetable garden. Cover the drip hoses with an inch or two of organic mulch. This is one of the most efficient methods of watering your garden, so I recommend using it if you live in an area where water usage is a concern, such as the American Southwest. Drip irrigation is also a great alternative if you find watering by hand to be difficult or tedious. I personally really prefer watering by hand, because it is great exercise, it allows me to precisely monitor the amount of water I am providing to my plants, and it forces me to get up close and personal with my vegetables. The last point is very important, because you will always want to be monitoring your plants for signs and symptoms that they are not getting enough nutrients or are under attack from pests or diseases. This leads me right into the next section.
3b. Pests and Diseases
As with all of the crops in your vegetable garden, the best approach to pests and diseases is prevention, through the practices of crop rotation and proper sanitation. Especially when you are growing your broccoli in raised beds that promote good air circulation and water logged root systems, and that have properly adjusted pH levels, most disease problems just will not happen.
Broccoli is susceptible to a few common pests. Broccoli is in the cabbage family and is subject to many of the same pests as cabbage. Chief among them in common is an insect known as the cabbage looper. These are small green worm like larvae of a nondescript moth that has mottled brown and gray colors. The moths will lay their eggs on the underside of leaves, either singly or in groups of as many as six. When the eggs hatch, the green larvae grow very quickly as they consume three times their body weight in vegetable matter each day, leaving a slimy trail of fecal matter behind them. They get their name because of their very distinctive “looping” style of movement.
Since these pests rarely eat the crowns of broccoli and do not bore into the plant’s stalk, on the scale of a backyard vegetable garden, the impact they cause is relatively small and can be controlled by picking them off by hand. If you are fortunate enough to keep chickens in your backyard garden, you will find that they consider cabbage loopers to be a delicious treat. However if you do find that an infestation of cabbage loopers is becoming serious, you can control them with an application of Bt, or Bacillus thuringiensis. Be sure to apply a preparation of Bt according to label specifications.
Cabbage loopers have a lot of natural enemies, including nuclear polyhedrosis virus, or NPV. If you pay careful attention and notice any cabbage loopers that have turned whitish and are hanging limp from the undersides of the broccoli’s leaves, they are dying from an NPV infection. When you do see them in this state, collect the dying larvae in a coffee can, wait a few hours for them to die, and then mash them up and add them to a water spray bottle. Apply the spray to your broccoli plants. Any cabbage loopers that feed on the treated vegetation will die within a week.
Cabbage root maggots can be a problem as well, especially for young seedlings. The best way to prevent cabbage root maggots is to never apply compost that is not completely finished to the beds, and never plant broccoli seedlings sooner than three weeks before the last spring frost. These maggots are the larvae of a fly that resembles a typical housefly. The most obvious sign that cabbage root maggots are attacking your plants is that they remain wilted even after thorough and regular watering. If you see plants presenting this sign, pull one of the poorest looking ones up and check its roots, which will probably be covered with small whitish grubs. Once you do have the problem, the best you can do is drench the root systems with a mixture of neem and rotenone. Of the root damage from the maggots was not allowed to become too extensive, the plants should be able to reestablish themselves and thrive.
Earwigs can be a real problem for broccoli (as well as cauliflower). They are harmless to people but are a rather nasty looking insect about three quarters of an inch long with prominent pincers at one end. The hide in the heads of broccoli and cauliflower and do lots of damage to the crown if you do not find them until harvest. I do not know of any organic sprays that can effectively deal with earwigs, although Sevin does work. If you do apply inorganic pesticide to broccoli, be sure to wash the heads very thoroughly before you eat them. Broccoli will not absorb too much of the chemical spray to be harmful (unlike vegetables like tomatoes, which will). You can prevent earwigs from becoming a major problem by surrounding your broccoli bed with gravel for several feet in every direction. You can also trap earwigs by placing damp, loosely rolled up newspapers near areas where they are a problem and leaving them overnight. For some reason earwigs are very attracted to these impromptu “motels” and will spend the night in them. Collect the newspapers early in the morning and dispose of them in the trash.
Clubfoot is a disease of all of the crops in the cabbage family, including broccoli, and it has symptoms that are not unlike those of a cabbage root maggot infestation: your plants are wilting in spite of receiving adequate water. This disease cannot survive in soils that have a pH above 6.8, so you can prevent it from spreading by mixing a handful of lime into the soil in the hole you dig for transplanting seedlings.
Other fairly common broccoli diseases such as black leg black rot, downy mildew, turnip mosaic virus, and others are best prevented by making sure you rotate your garden beds each year, keep weeds far away from vegetable garden beds, avoid working in the beds during wet weather, and be conscientious about how you compost your plant residues (do not put diseased or infested plant matter in the compost pile, make sure the center of the pile is reaching its maximum temperatures, and only apply well finished compost to the vegetable garden beds). If these measures are still not enough, you can pretreat your seeds (as they may themselves be harboring some of those diseases) by immersing them in water at 122 degrees F for five minutes before you plant them. Downy mildew can be treated by spraying seeds with a baking soda spray. Mix one tablespoon of baking soda per gallon of water.
3c. Harvest
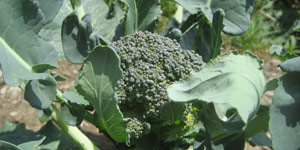
To be honest, there is much more art than science to determining when to harvest broccoli. The time frame for doing so is very limited, and you want to be sure you harvest your broccoli before the buds on the heads start flowering (the flowers are, however, quite perfectly edible, and rather tasty, too). The key to harvesting broccoli is keeping a keen eye on it when it is close to being ready. As the florets on the head are getting larger, look at them every day for any sign that they are ready to open. If they seem like they are, harvest them right away. You can keep harvested broccoli heads in your refrigerator in a plastic bag for up to a week, until you have enough accumulated for cooking or preserving.
When harvesting broccoli, use a sharp knife and cut the stalk just below the head at a downward angle. You will probably get many individual florets growing on the broccoli plant (especially if you are growing sprouting broccoli varieties), and you can continue to harvest them over the next several weeks to use in salads or other recipes.
Because broccoli can interbreed freely with other plants in the cabbage family – such as cabbage, kale, and cauliflower – and because they are pollinated by wind and insects, maintaining purity for successful seed saving requires that only one variety be allowed to flower for seed production at any given time.
To save seed for broccoli, simply do not harvest the heads from twenty or more plants in close proximity to one another. Allow them to flower, and they will soon develop seed pods. Once the pods have turned brown, strip them off of the plant and into a bag, break up the pods, remove larger debris, and winnow them out using a fan and a white bed sheet. Store them in a labeled envelope in a cool, dry place.
4. Final Word
I hope you enjoyed my guide on how to grow broccoli! In this guide, we learned a bit about the history and popularity of broccoli, and how to differentiate between the different categories of broccoli that you can grow. Then, we learned about preparing the soil for how to grow broccoli, and how to start broccoli indoors as well as determine when you should start your seeds. Next, we learned about maintenance, including weeding, watering, and how to grow broccoli that is free of pests and diseases, as well as how to deal with pests or diseases that may appear. Finally, we learned about harvesting broccoli and saving the seeds. You are now an expert on how to grow broccoli!